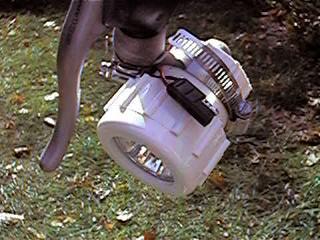
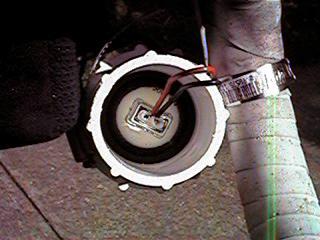
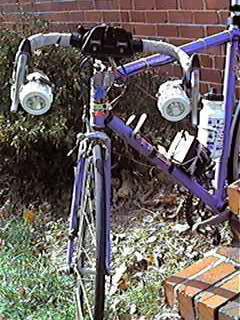
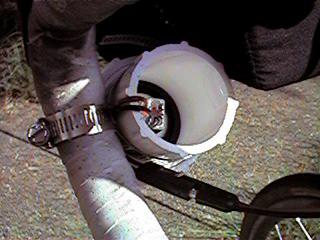
The key to this lighting system is the way the 12V bulbs made for use in track lighting fit into PVC couplings designed for plumbing. Thank's for showing me that trick, Ron.
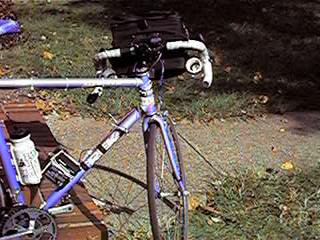
My solution for mounting the lamp assembly to the bike is to use two hose clamps. Simple, aimable, effective.
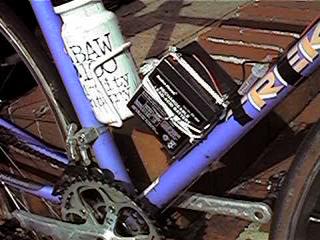
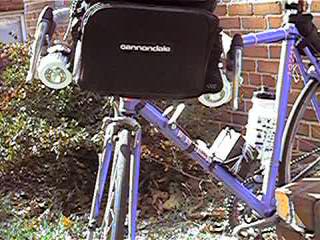
I had a piece of metal that makes a good cradle for holding the battery. I drilled it so that I could screw it into the same threaded holes on the down tube that the water bottle mount uses.
I happen to have a variable voltage DC power supply (~$100) and multi-meter (~$20) which I use to to charge the battery. (Of course, I've found these things to be useful for other applications.) If I keep an eye on the charging current, I can charge it in only a couple of hours. However, one could trickle charge using a Wall-Wart style charger and still come up with an under $50 lighting system.
Go to your local home supply store (Home Depot, Hechinger, Farm & Fleet, etc. ). In the lighting section, find 12V halogen bulbs intended for decorative low voltage track lighting. The good ones are the MR-16 size, which have flat protective front face and integral reflector. Pick your wattage and flood or spot beam style. Then go to the plumbing section and find PVC pipe connectors, which are about six inches long and have a screw-on cap at each end. Between the screw-on cap and the tube section are neoprene rubber gaskets. Pick up 4 hose clamps that will fit around the PVC tube. If you local home supply store doesn't have Gel Cell "Alarm System Batteries" and electrical hook-up wire and connectors, Radio Shack has them.
Saw the PVC tube in half with a hacksaw. Cut one of the neoprene rubber gaskets in half with a pocket knife. Solder wires on to bulb contacts. Slide half-gasket in PVC tube, then the lamp, and screw the cap on to hold the lamp in place. Fold the wires over the back cut edge of the PVC tube, and slip the hose clamp over from the back end. Open a second hose clamp and slip it between the first and the PVC tube, then snug up the first hose clamp around the tube. The second hose clamp can go on your handlebars or front fork. There you go, do it for the other section if you bought two bulbs.
Maybe you can cram the battery into an old water-bottle cage, but mine broke. I drilled holes in a piece of scap metal so I could screw it to the bottle mount holes on the bike frame, then used a bit of wire and string to hold it in place. The electrical parts are: Battery, crimp-on spade connectors, in-line fuse section in one line, automotive connector wire, the automotive connector itself, more wire, solder to bulb. Good quality black electrical tape (say 3M) is a joy to work with, and is great for holding wires on the bicycle tubing, and it even can be removed cleanly after a few years of exposure to the elements. Poor quality black plastic tape can be a nightmare. Also those nylon wire ties are useful, and come in bright stylish colors.
I use 20W halogen bulbs. Bulbs the same size are available in a range from 10W-75W. While I have two mounted on the bike, I have yet to run them both at once. As it turns out, 20W is just about the right load for a 4 A-H cell, and my 1 hour commute gives me a 50% discharge. This combination should yield good battery life.
A 7 A-H cell may be in order if I really want to run both bulbs (using 40W). For now, I am experimenting with "Spot" vs. "Flood" lamps. Seems that spot might be best for the cyclist who wants to see the road, but flood might be best for being seen by motorized traffic in the urban environment.
Depending upon the quality to the wire insulation, it might be a good idea to wrap the wires in black electrical tape where they would contact the hose clamp. If you're attaching to the front fork, a layer of black tape under the hose clamp might keep it from scratching and slipping a bit.
If you don't like the white PVC, it can be painted with flat black spray paint for that stealth look.
Jim Robertson's lightbrain.
Ben Sanford wrote in the dc.biking newsgroup: "Smart chargers for NiCd batteries in bicycle sizes are, in general, home made. Myra VanInwegen has an article about it. Go to the link about making a NiCd smart charger and it will take you to two articles. The second one is by Marty Goldman, the most prolific poster on chargers on the Bikecurrent list.
You may also want to check out the FAQ of Bikecurrent, a good introduction to bicycle lights."

I use LED blinky things for rear lighting. Maybe I'll make a steady 12V red rear light too.